Shoot Product Photography Like A Pro
- 15 September 2016
- ByNick Fancher
- 16 min read
Nick Fancher is a pro photographer who's worked with everyone from Stereogum to IBM. You may have also seen his work featured in The New York Times, ESPN The Magazine, and Forbes Japan. He's been kind enough to break down his approach to capturing stunning product photography with a simple setup.
Recently Nate Hanson wrote a fantastic article on how to shoot product by using direct sunlight as a light source. If you're a beginner photographer, start there for a great primer on DIY product photography. Everything he said was right on, and you can’t argue with his final images.
But what if you are shooting in Seattle or Columbus, Ohio, where it’s raining or overcast half the year? Or what if you only have time to shoot at night because you're still moonlighting as a small business, punching a clock 9-5 all week? If this describes your situation, you'll need more options than just sunlight. Read on and I'll teach you some advanced photo techniques to shoot products in a studio-like environment, without breaking the bank.
The Gear
Let’s start off by (briefly) discussing gear. I use a Canon 5D Mark III, which isn’t a cheap camera. That said, any camera with a hot shoe - the mount on top for a flash or other accessories - could be used for these scenarios. If you're currently looking to purchase a cheap dSLR, I’d recommend purchasing a used camera with a full frame sensor, if possible, such as a Canon 5D. An adequate used dSLR should run you around $300, and a great place to pick up well cared for used gear is fredmiranda.com. You'll also need a lens - the best bang for your buck is a “nifty fifty” Canon 50mm f/1.8 lens. Brand new they run $125.
Your second purchase should be a flash. Again, it doesn’t need to be a fancy one. You can use the inexpensive Yonguo flash system, which works just fine. Don’t forget to purchase a transmitter, a piece of gear that you use to trigger your flash. You may also want a light stand and a white or silver umbrella, though in these demos I don’t use them. The flash, transmitter, light stand, and umbrella add another $150 or so to the total price.
Your final expense should be licensing Lightroom and Photoshop from Adobe. This photo-editing package costs just under $11 per month and keeps you running the most current software. All-in you're spending around $600 to get a nice starter kit.
Natural Light
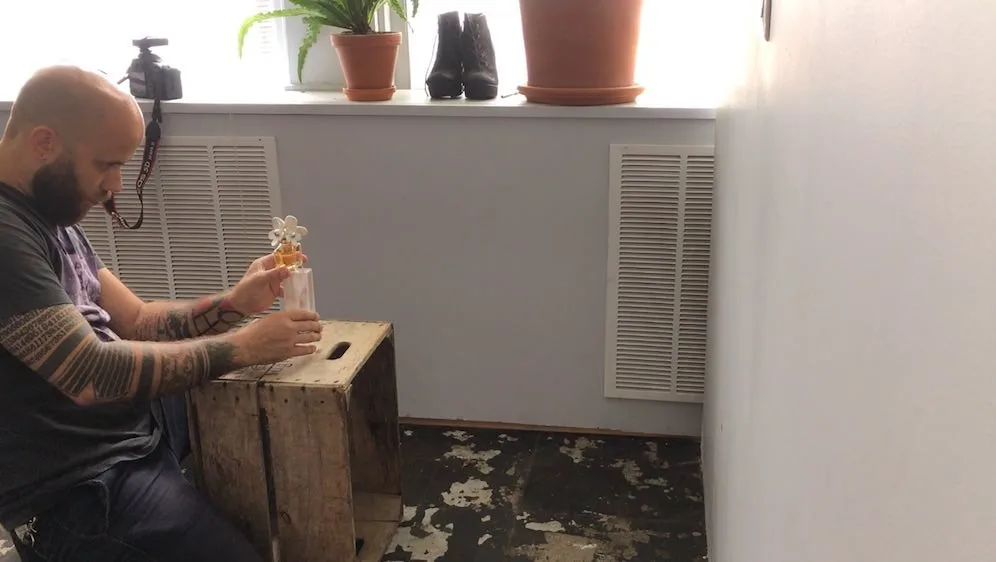
Figure 1
In figure 1 you can see my setup. For these exercises I'm using a bottle of perfume that has both reflective and transparent areas, since these are trickier than most objects to light. Opaque, non-reflective surfaces are much easier to light.
I placed the perfume bottle on a piece of clear plexi-glass, two feet in front of a light gray wall. Any light-toned, neutral colored surface or backdrop will suffice - whatever complements your products best. Since I'm starting out by using available light, I placed the product near a window with indirect light. I also made sure to wipe the bottle clean of any fingerprints in order to save time trying to Photoshop them out after the fact.
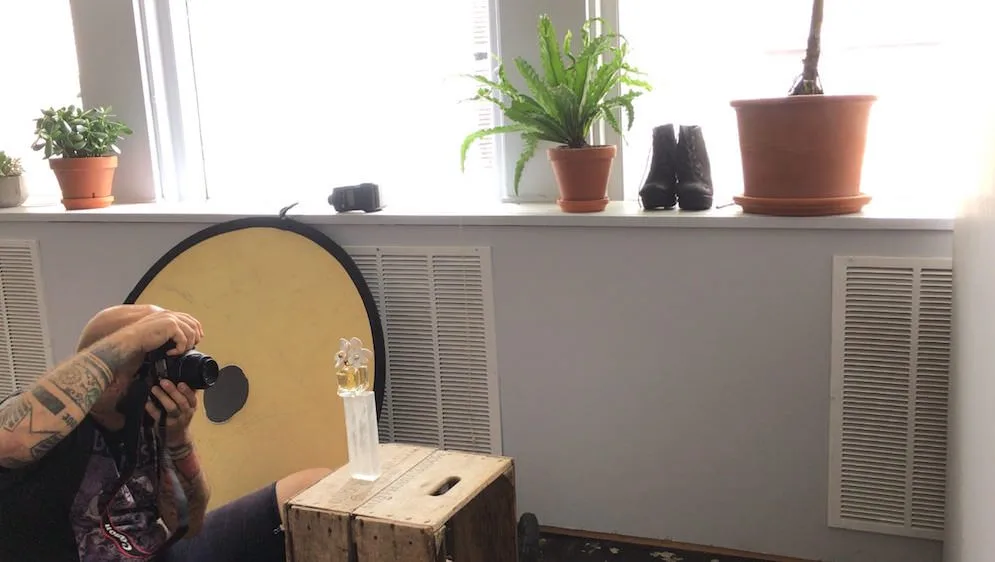
Figure 2
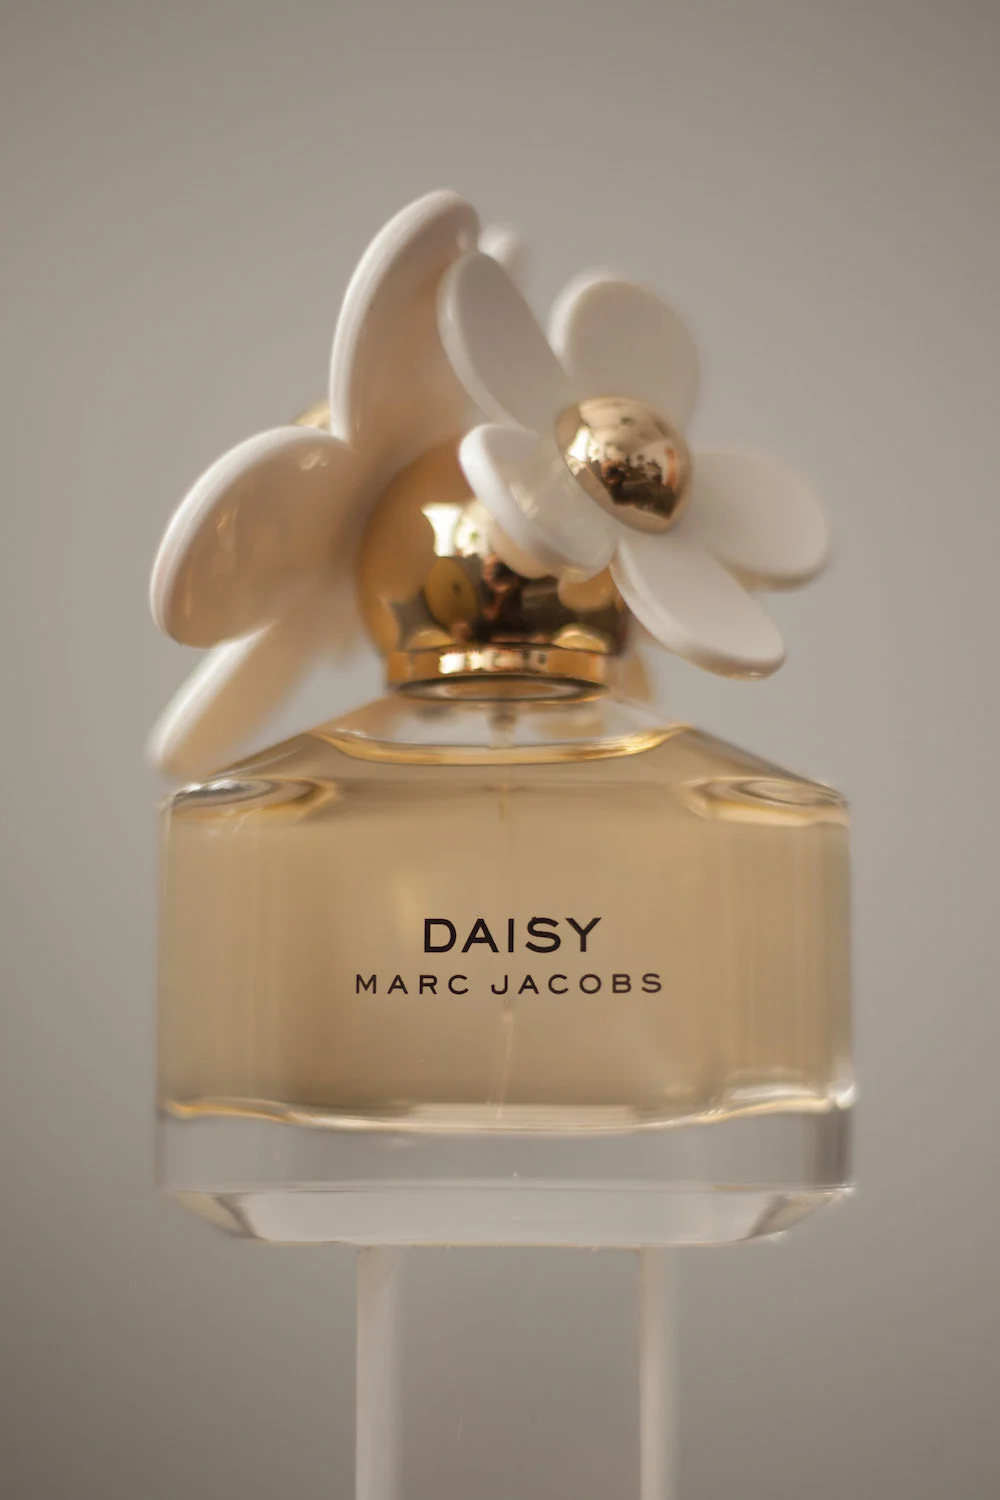
Figure 3
Though I personally use my 5D Mark III and an 85mm f/1.2L lens for work, I opted to use my backup 5D Mark II camera with the "nifty fifty" lens to give you a better idea of what you could get with your starter kit.
In figures 2 and 3 you can see the setup alongside the unedited raw file. One thing you might notice is that the logo on the bottle is sharp, while the rest of the bottle is slightly out of focus. This is due to my close proximity to the bottle and my camera settings - I was shooting with a wide-open aperture of f/1.8 at an ISO of 320. In order to get the whole bottle in focus I'll need to close down my aperture to something like f/3.2. To keep the image bright, that means I'll also need to slow down my shutter speed and raise my ISO a bit.
Taking a closer look at the reflective parts of the bottle, you'll see a lot of darker areas. The dark room behind me caused this. To fix this I placed a 40”x60” piece of white foam board on the right side of the bottle - this will help bounce some light from the window back onto the product. This also helps block out some of the dark room in the reflection.
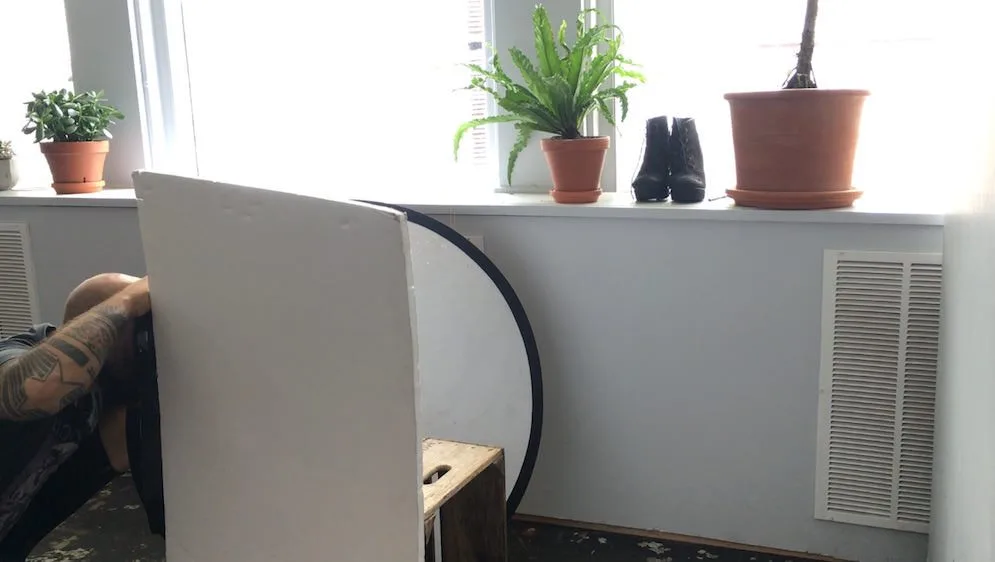
Figure 4

Figure 5
You can see what leaning a simple white board looks like in figure 4, and how it improves the image in figure 5. For that photo, I bumped up my ISO to 500, which allowed me close down my aperture to f/3.2, resulting in a sharper image.
Strobe Light
Now it’s time to start using your flash. Don’t panic. It’s not as scary as it may seem at first. Start by putting it in manual mode, rather than ettl. Ettl is the equivalent of auto mode, meaning the camera will do its best to guess what the flash output should be. Sometimes it’s right, but too often it’s wrong, so I'd recommend sticking with manual mode.
When it comes to using a flash, you typically want to use a modifier - such as an umbrella or soft box - to give the light a soft quality. But you can also get soft light by bouncing it, which is a faster, cheaper option. I’ll go over these techniques below.
On-Camera Strobe

Figure 6

Figure 7

Figure 8
In figure 6, you can see that I placed the flash on top of my camera’s hot shoe and aimed it up towards the ceiling. Bouncing your flash off the ceiling produces an even, soft quality of light. You just need to be aware of a couple things in order to get a good result.
The room I was shooting in had 9-foot tall white ceilings. Low, white ceilings are ideal for bounced light. If the ceilings are wood or painted dark this technique won’t work, so keep that in mind.
Also make sure that you aren’t bouncing the light into a light fixture or another object, as it will affect the amount of light that bounces back down on your product. For example, though my flash was set to ¼ power in both figure 7 and figure 8, the images are dramatically different. The darker image (figure 7) was caused by my flash firing into a fluorescent light fixture, rather than bouncing off the white ceiling panels on either side of it. In order to fix this I moved everything about three feet to the right, resulting in the brighter image (figure 8).
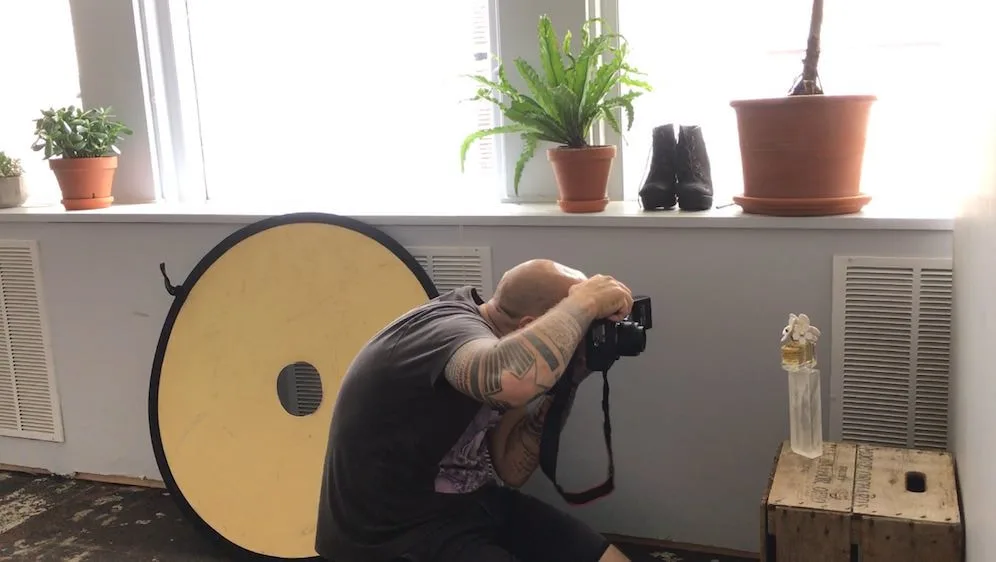
Figure 9

Figure 10
You can also bounce your flash off a nearby wall or surface - again as long as the surface is light in tone and neutral in color. That's how I'm shooting in figure 9. This approach gives the light a more directional, moodier quality (figure 10) than the more evenly lit technique.
Though I like the light in this shot, I find the glare on the bottle to be a bit distracting. Take away: Pay attention to the angle of your product in relation to your light in order to reduce any glare, especially on important parts of the product like a brand name.
Off-Camera Strobe
Now that you've got some practice with a flash, up next is learning to shoot with an off-camera flash. There's a whole online community dedicated to the use of small, off-camera flash use, known as Strobist. Check out groups on sites like Flickr, Facebook, and 500px for helpful info and techniques, especially if you’re interested in building on what you’re starting here.
To trigger your flash when it's not on your camera, you need to have a transmitter on your hot shoe that can speak to your flash. Some flashes have a built-in receiver, such as the Cactus system. If your flash doesn't have a built-in receiver, you'll need to purchase one for your flash as well, so your camera can trigger your light.
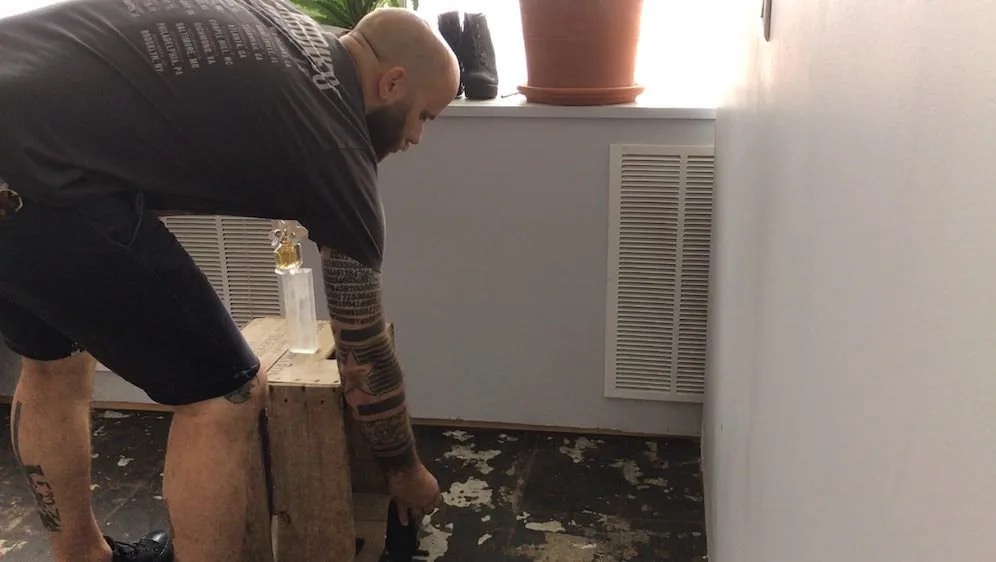
Figure 11
In figure 11 you can see I placed my flash right behind my product, which was two feet in front of a white wall. I aimed the flash so it'd hit the wall behind the product and bounce light back onto it.

Figure 12
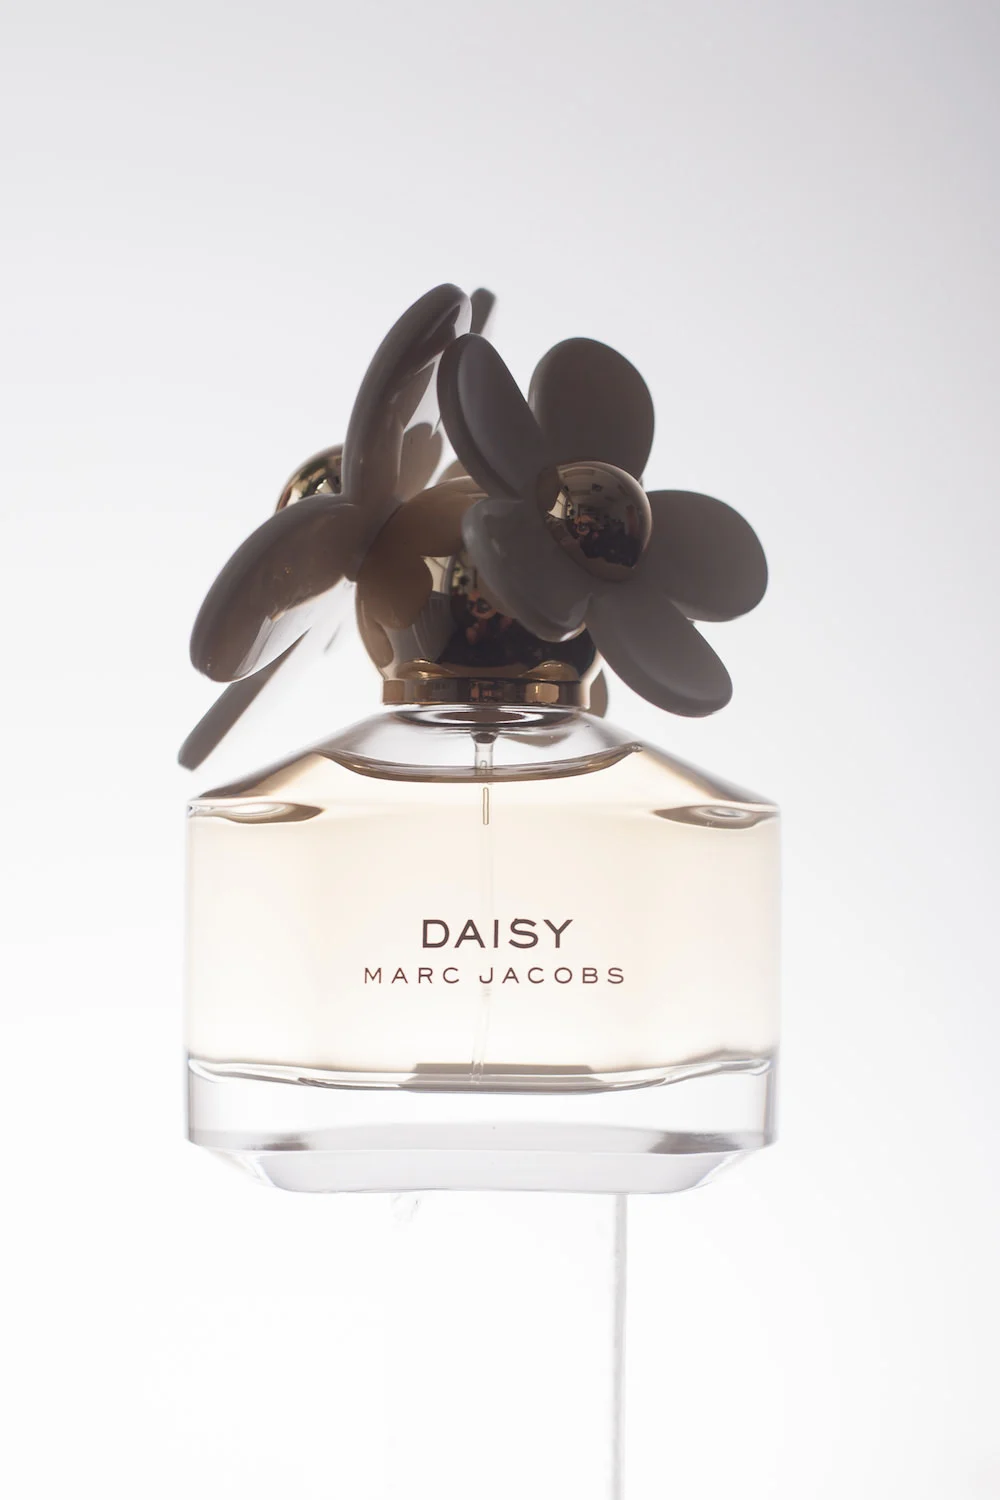
Figure 13
My flash was zoomed out to a wide light spread of 24mm and set to a medium output of 1/8 power as a starting point. Don't be afraid to play around with the settings to see which adjustments impact the image.
I lowered my ISO to 100 and closed down my aperture to f/5 and took a shot. Shutter speed doesn’t usually come into play when using flash, unless it’s too low or too high (keep it under 1/160). That said, if your image is too bright or too dark, aside from changing your flash output, first try opening up or closing down your aperture and adjusting your ISO. In figure 13 you can see that while the glass is well lit, the top of the bottle is too dark.
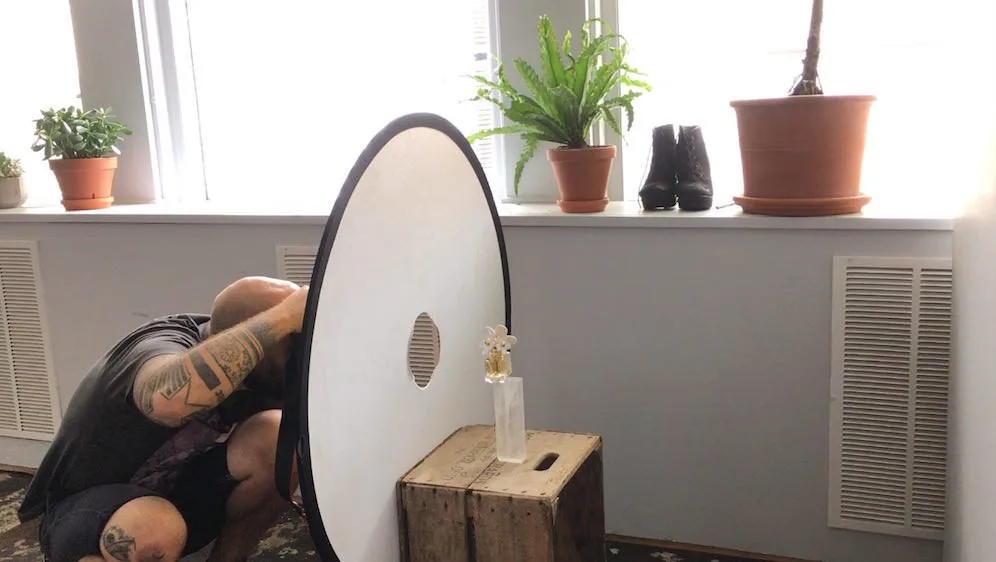
Figure 14

Figure 15
Normally if I were shooting on seamless white background, I’d have one or two lights just on the background, and another one on the product. Since this is all about photography on the cheap, I'll show you how to make this work with one light.
One cool trick is to take a disc reflector and cut a lens-sized hole in it. Don’t worry, the fabric is strong so the hole won’t spread. Once you do that, you can place the reflector right in front of the product, and this will bounce some of the background light back on to the front of the product (figure 14).
Not only does this reflector fill in some of the shadows but it also hides some of the dark background in the reflection, as you can see in figure 15.
Watch Nick in action
Lightroom
Now for a crash course in Lightroom, Adobe's photo-editing app. I’d recommend reading or watching some more extensive tutorials on Lightroom. It’s a program that takes years to master, so don’t be hard on yourself. But if you follow my steps, you'll know enough to be effective at it.
Figures 16 and 17
Once you've imported your images into Lightroom, head over to Develop.
You’ll first want to narrow your images down to the best file of each product. This is known as culling. I go through and hit the right bracket key to give my favorite images a star rating. Once I've rated everything, I sort by rating of one star or more to eliminate any shots I definitely don't want to use.
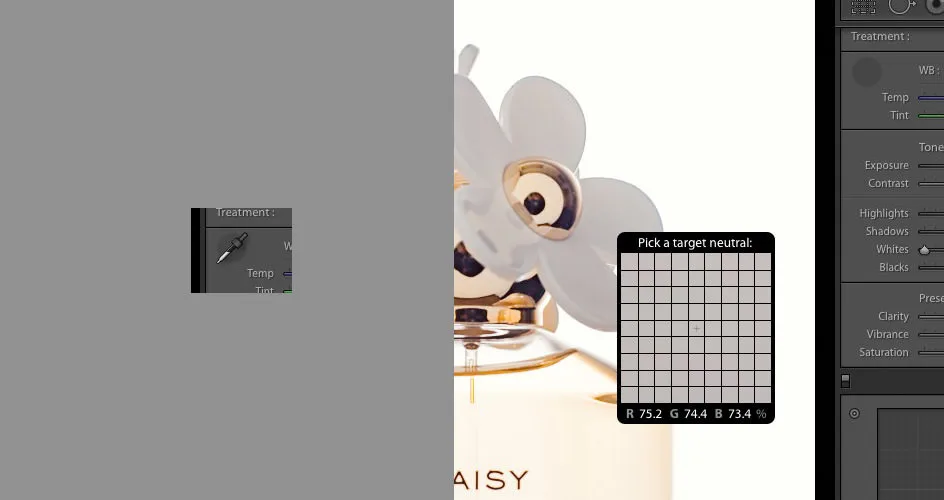
My next priority is making sure that the white balance is accurate. I select the eyedropper tool, seen in figure 16, and click on a white or gray part of the image. In my case, I clicked on the white portion of the bottle’s lid (figure 17).
This next part is good if you want your background to be pure white. If you’ve ever tried to shoot on a white background, you likely know how hard it is to get a pure white color. Depending on your computer monitor, the background may even look pure white on your screen, only for you to see something different when viewed on another screen, such as your phone.
Figures 18, 19, and 20
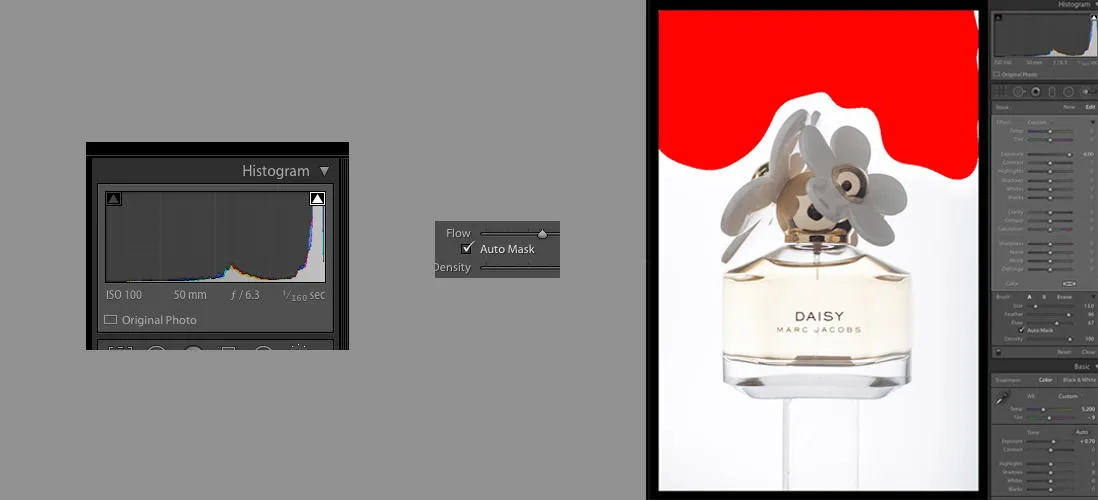
In order to make sure that the white is really white, toggle the highlight indicator in the histogram, as seen in figure 18. With the highlight indicator on, any area in your image that is pure white will show up as red. Now select the brush tool and set the exposure to 4.0. Make sure to set a high feather - I used 96 - and activate the Auto-Mask setting in figure 19. Now you can fairly quickly paint over the white areas in your image, bringing them to pure white, which is what I started to do in figure 20.
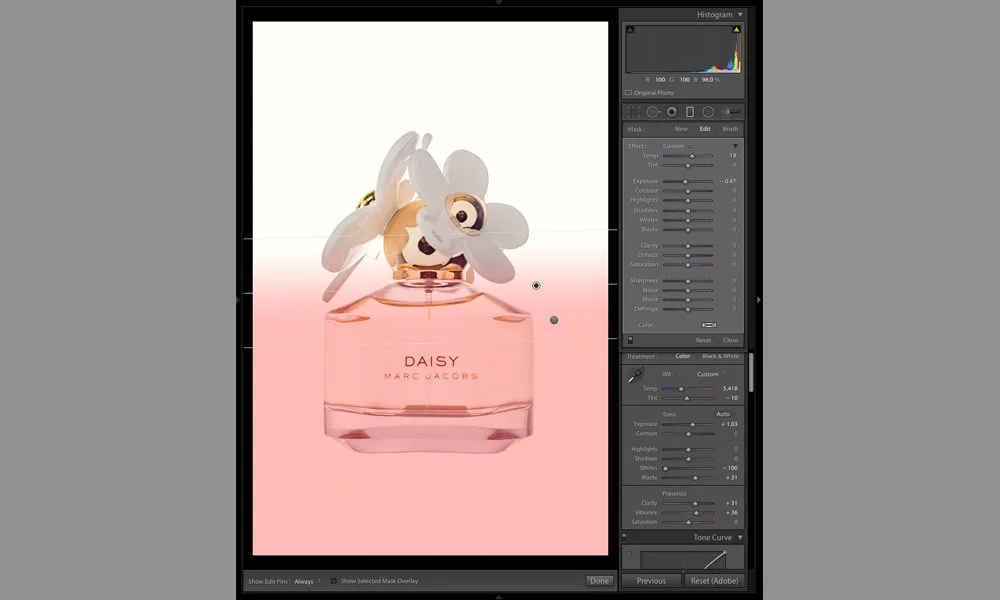
Figure 21
The next thing I want to do is brighten up the top area of the image to match the bottom. I also want to warm up the color temperature of the bottom half while leaving the top half alone. "Warm" color temperatures are reds and oranges, while "cool" color temperatures lean towards blue.
I make a Gradient Adjustment to do these tasks. In figure 21 you can see that I made two adjustments. The first was to click and drag from the top down, raising the Exposure slider to brighten the top. The second adjustment was to click and drag from the bottom up, warming up the color temperature and lowering the Exposure slider a bit.
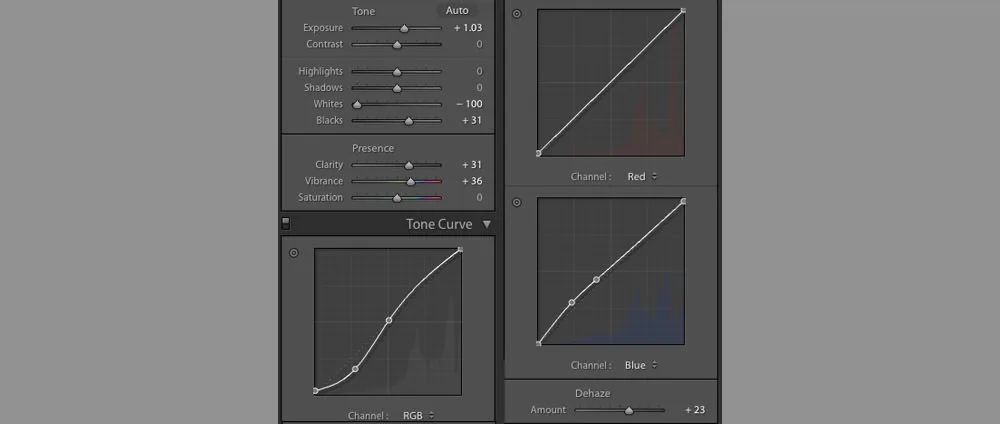
Figure 22
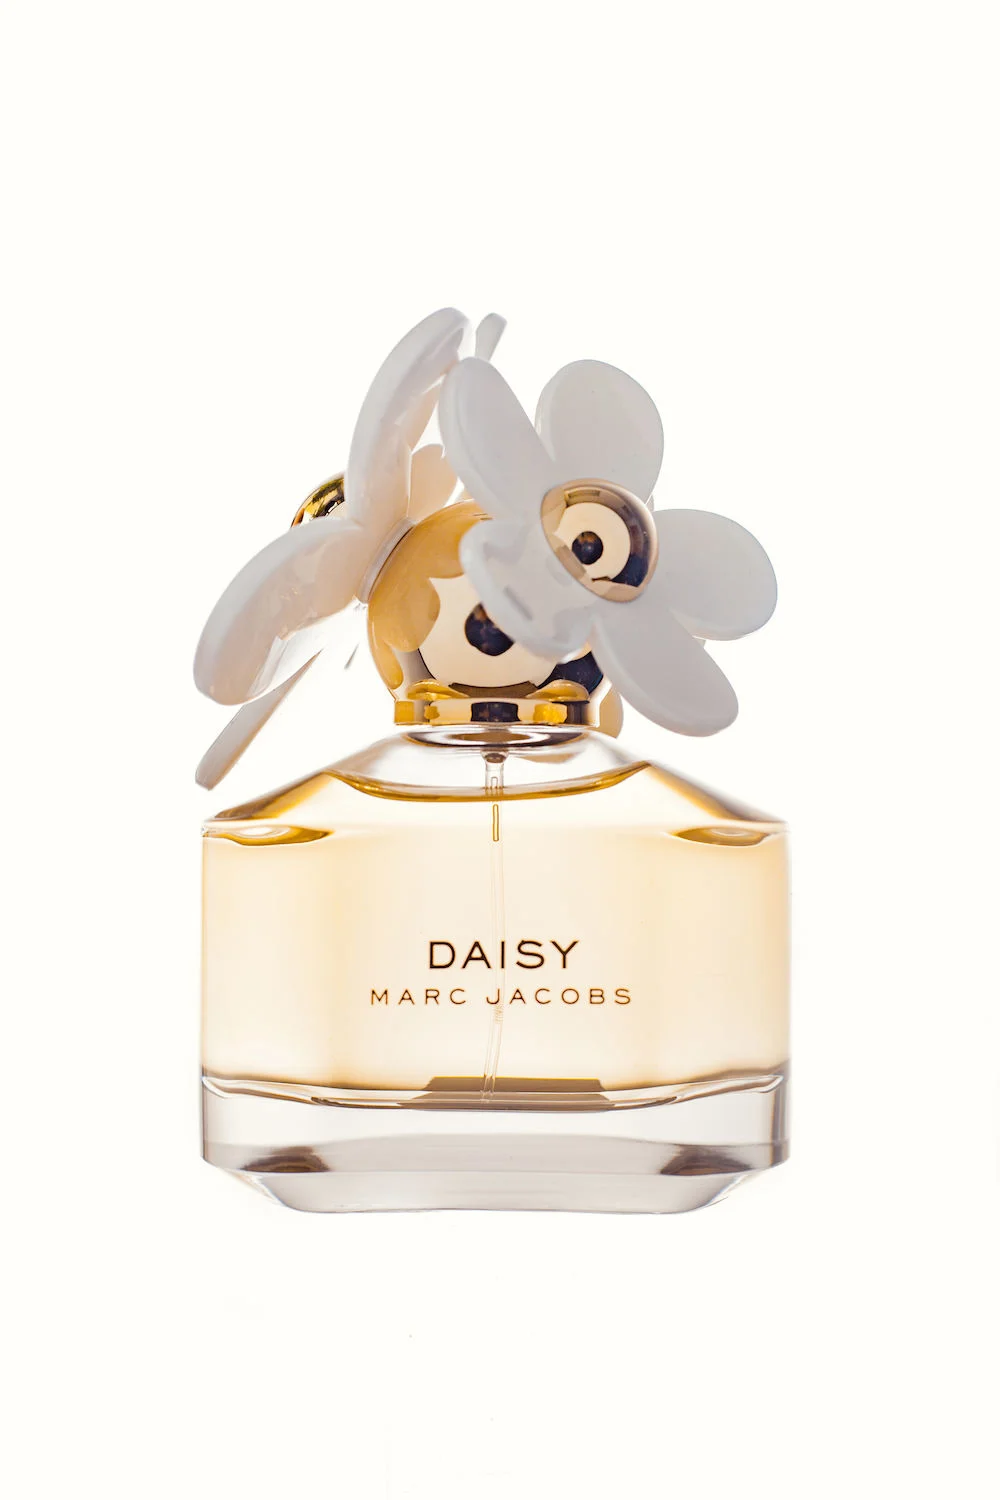
Figure 23
After all that, my image was evenly lit on a pure white background, but it still lacked punchiness. Now to color grade.
I lowered the Whites, increased the Blacks, bumped over the Clarity slider to +31, and increased the Vibrance, as seen in figure 22. A lot of this comes down to personal preference, and may vary a bit depending on your product. No adjustments are permanent, so play around with the levels until you find a look you like.
Next I toggled the Tone Curve button in order to get more control over the settings. I created a gentle s-curve in the RGB curve to add more overall contrast to the image. I also raised the shadow point in the red channel and blue channel, as well as lowered the highlight point in the blue channel to give the image a slight vintage wash, as you can see in figure 23.
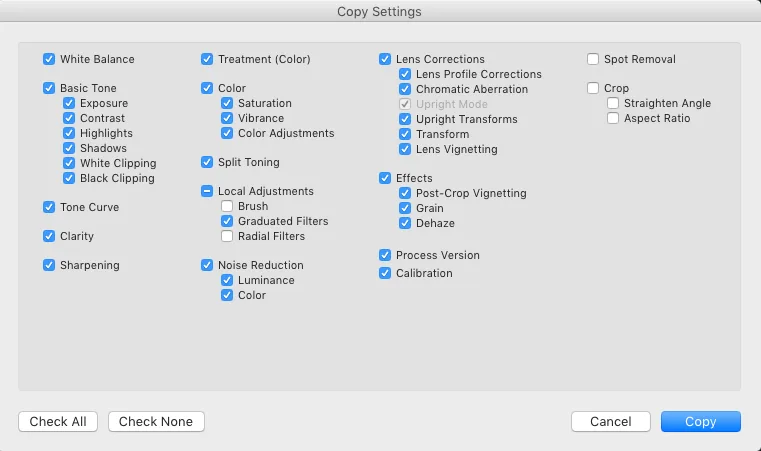
Figure 24
With the image looking good, I want to copy and paste the adjustments to the next image. This saves you a ton of time, rather than editing each image individually. I hit the “Copy” button on the bottom left of the panel and select which features I want to copy, seen in figure 24. Since certain features are unique to each file, such as a crop, spot removal, or brush adjustment, I uncheck those settings. Aside from that, the Basic Tone, Tone Curve, Graduated Filters, and Dehaze are copied over, assuring that the next images will match the first one in the series.
Going Forward
This is a LOT of info. Like a four-year college degree worth of info. Don’t be hard on yourself if it takes a while to grasp. The more photos you take, the more comfortable you'll get, and you'll be on the right path to finding the perfect look for your photos.
As I mentioned earlier, Strobist communities are a great resource for asking gear and technical questions or aesthetic advice. As always, take input with a grain of salt and do your best to develop a thick skin, because everyone is a critic. Just keep shooting and learning and your images will continue to improve.
15 September 2016
Words by:Nick Fancher
Tags
- Share